Hello!
com·mon·place book
noun
1. a book into which notable extracts from other works are copied for personal use

1/72 MiG-28bis
It’s been a minute! or 3 million…
Getting back into model building, I decided I wanted a nice, fun kit to knock the rust off. Something simple I could build right out of the box.
(HA.)
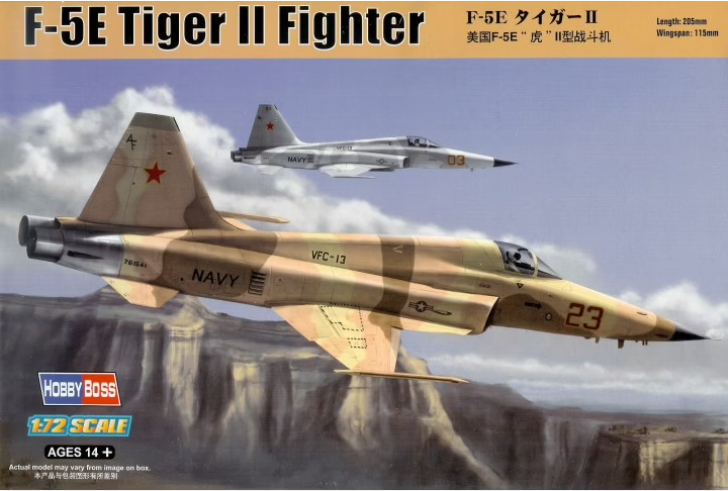
Anyways, I had a HobbyBoss F- 5E in the stash and thought that would be a good choice; fairly simple but detailed enough to look the part.
As I started prepping the build, I mulled over the various build options (Swiss, Brazilian, and a US Navy and Marine Agressor). I was thinking the blue Agressor option looked the best—but that got me thinking of the “MiG-28” from the original Top Gun movie and I thought it could be cool to do an updated version. Which of course meant my quick, simple OOB build was right out the window!

Talking to a couple of friends about the build, it was brought up that I should model the “MiG’ with an Exocet, as was mentioned in the movie. So of course I started to 3D model an Exocet using using Fusion360. That then lead to maybe chainging out the Sidewinders/K-13 aka AA-2 Atoll (a Soviet copy of the Sidewinder) missile on the wingtip rails with a newer, more Russian looking air-to-air missile. So I chose the AA-8 Aphid, which might actually be shorter than the wing-tip launch rail, we’ll see how that looks later.
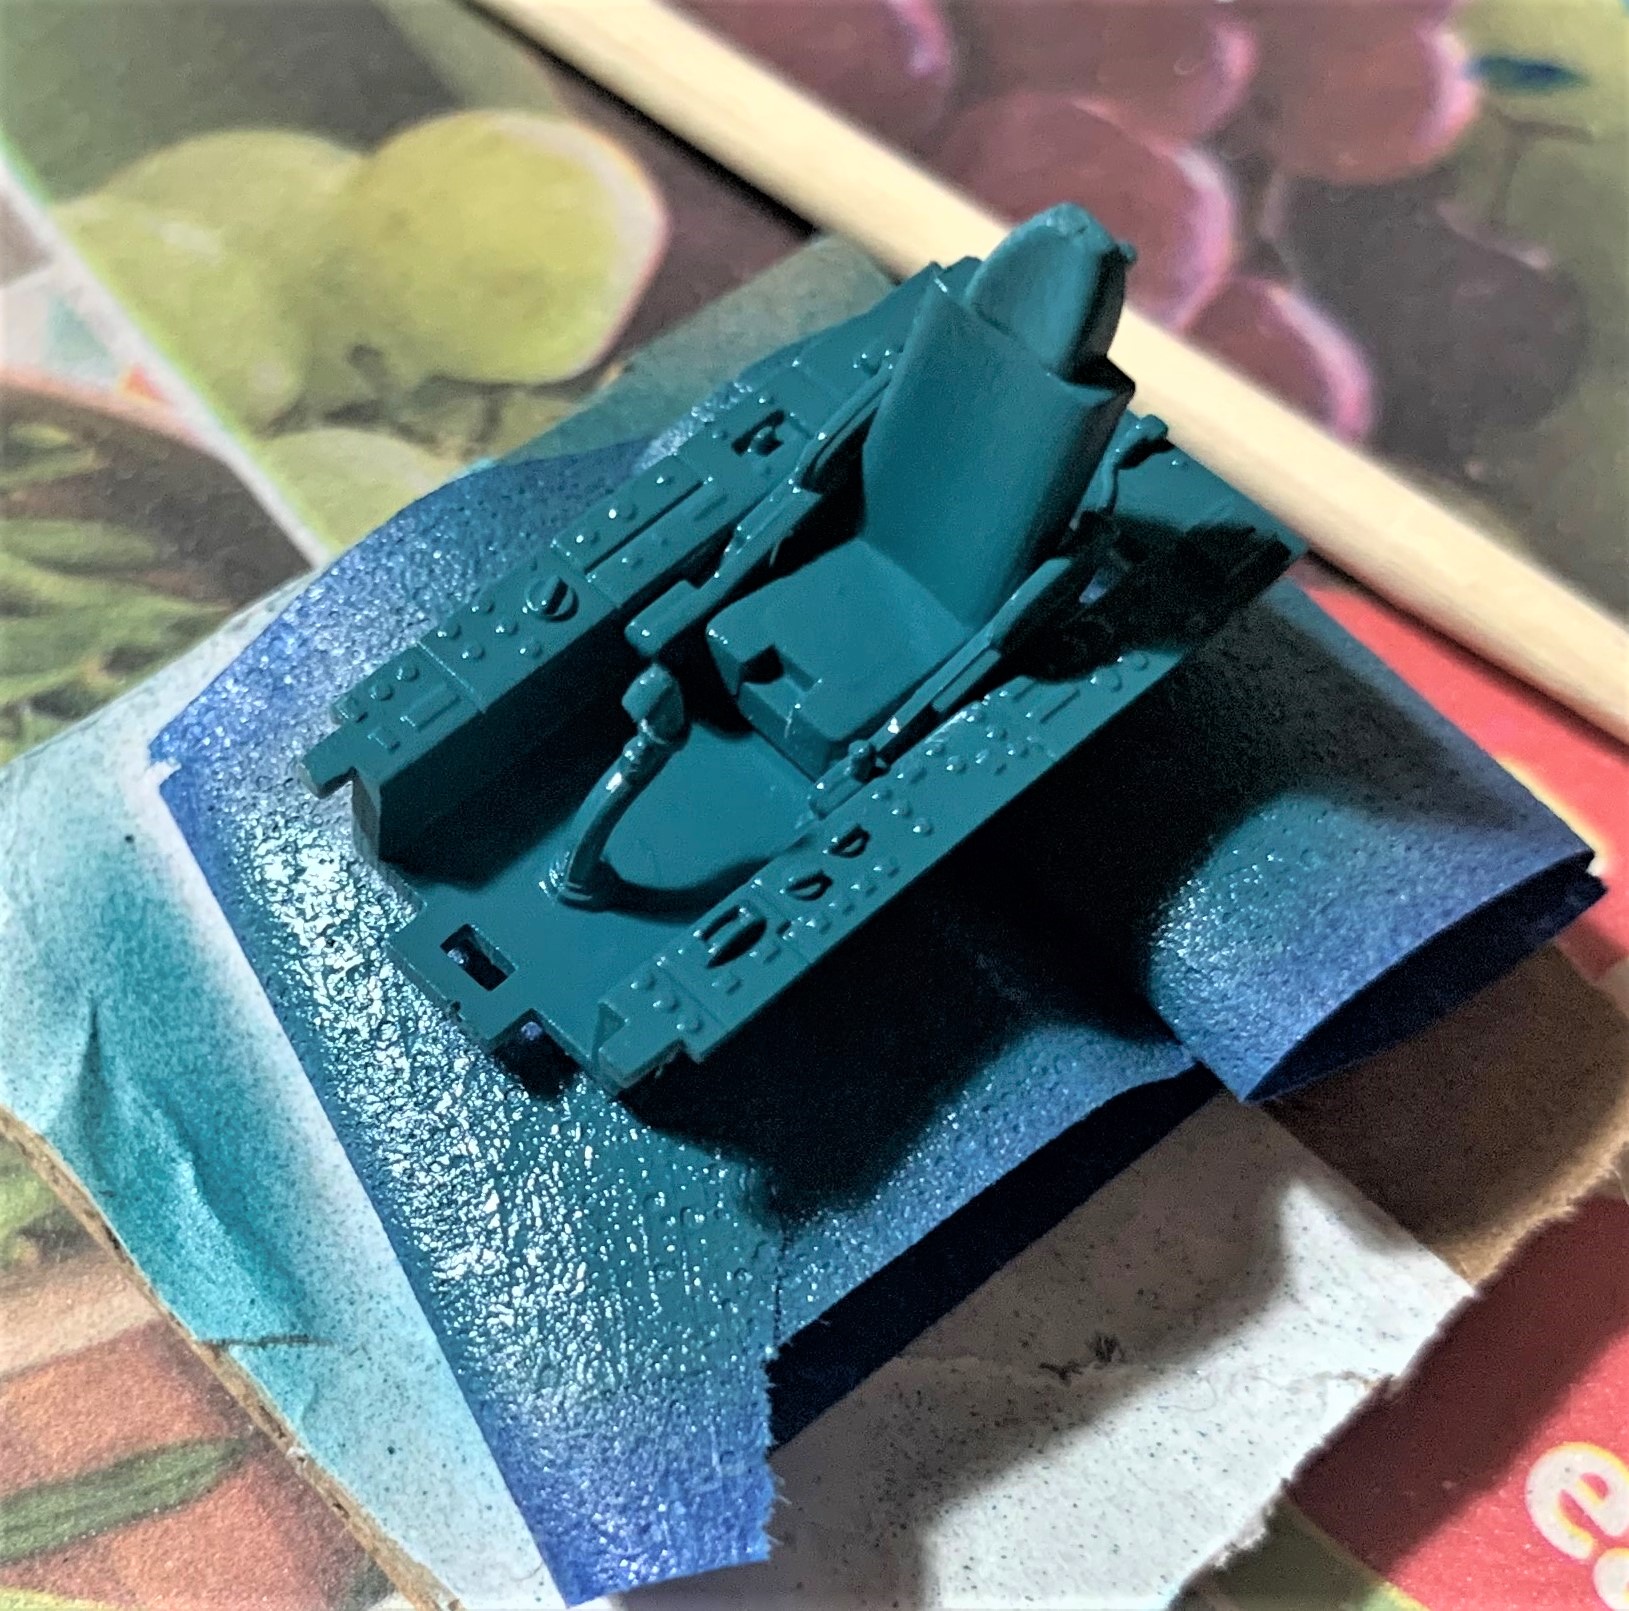
Starting the build was in the cockpit as usual. Looking back, I really wish I would have used a Soviet K-36 ejection seat instead of the ho-hum one included in the kit. But I was still in OOB mode then. I did mix up some cockpit blue-green used on Mig-21s and -23s (and many, many others) using a Tamiya mix recipe I found somewhere on the internet. Shockingly, the recipe was way off. But it’ll work for a dark basecoat and I can cover with a closer shade.
Compared to:

Just a bit off…
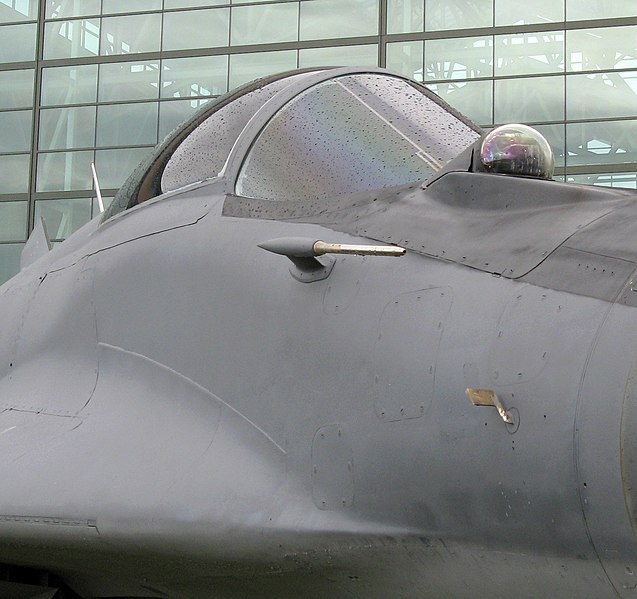
As I modeled the Exocet, I didn’t really comprehend the dimesnsions as I was scaling it, but it’s kind of big. Like I dunno if its going to fit on the MiG, big. While the angle is a bit weird, you can get a sense of scale compared to the Sidewinder, and on the center pylon of the Rafale:


Here is the Fusion360 model I did of the Exocet:

And here’s the print prototype with a quick dusting of white primer:
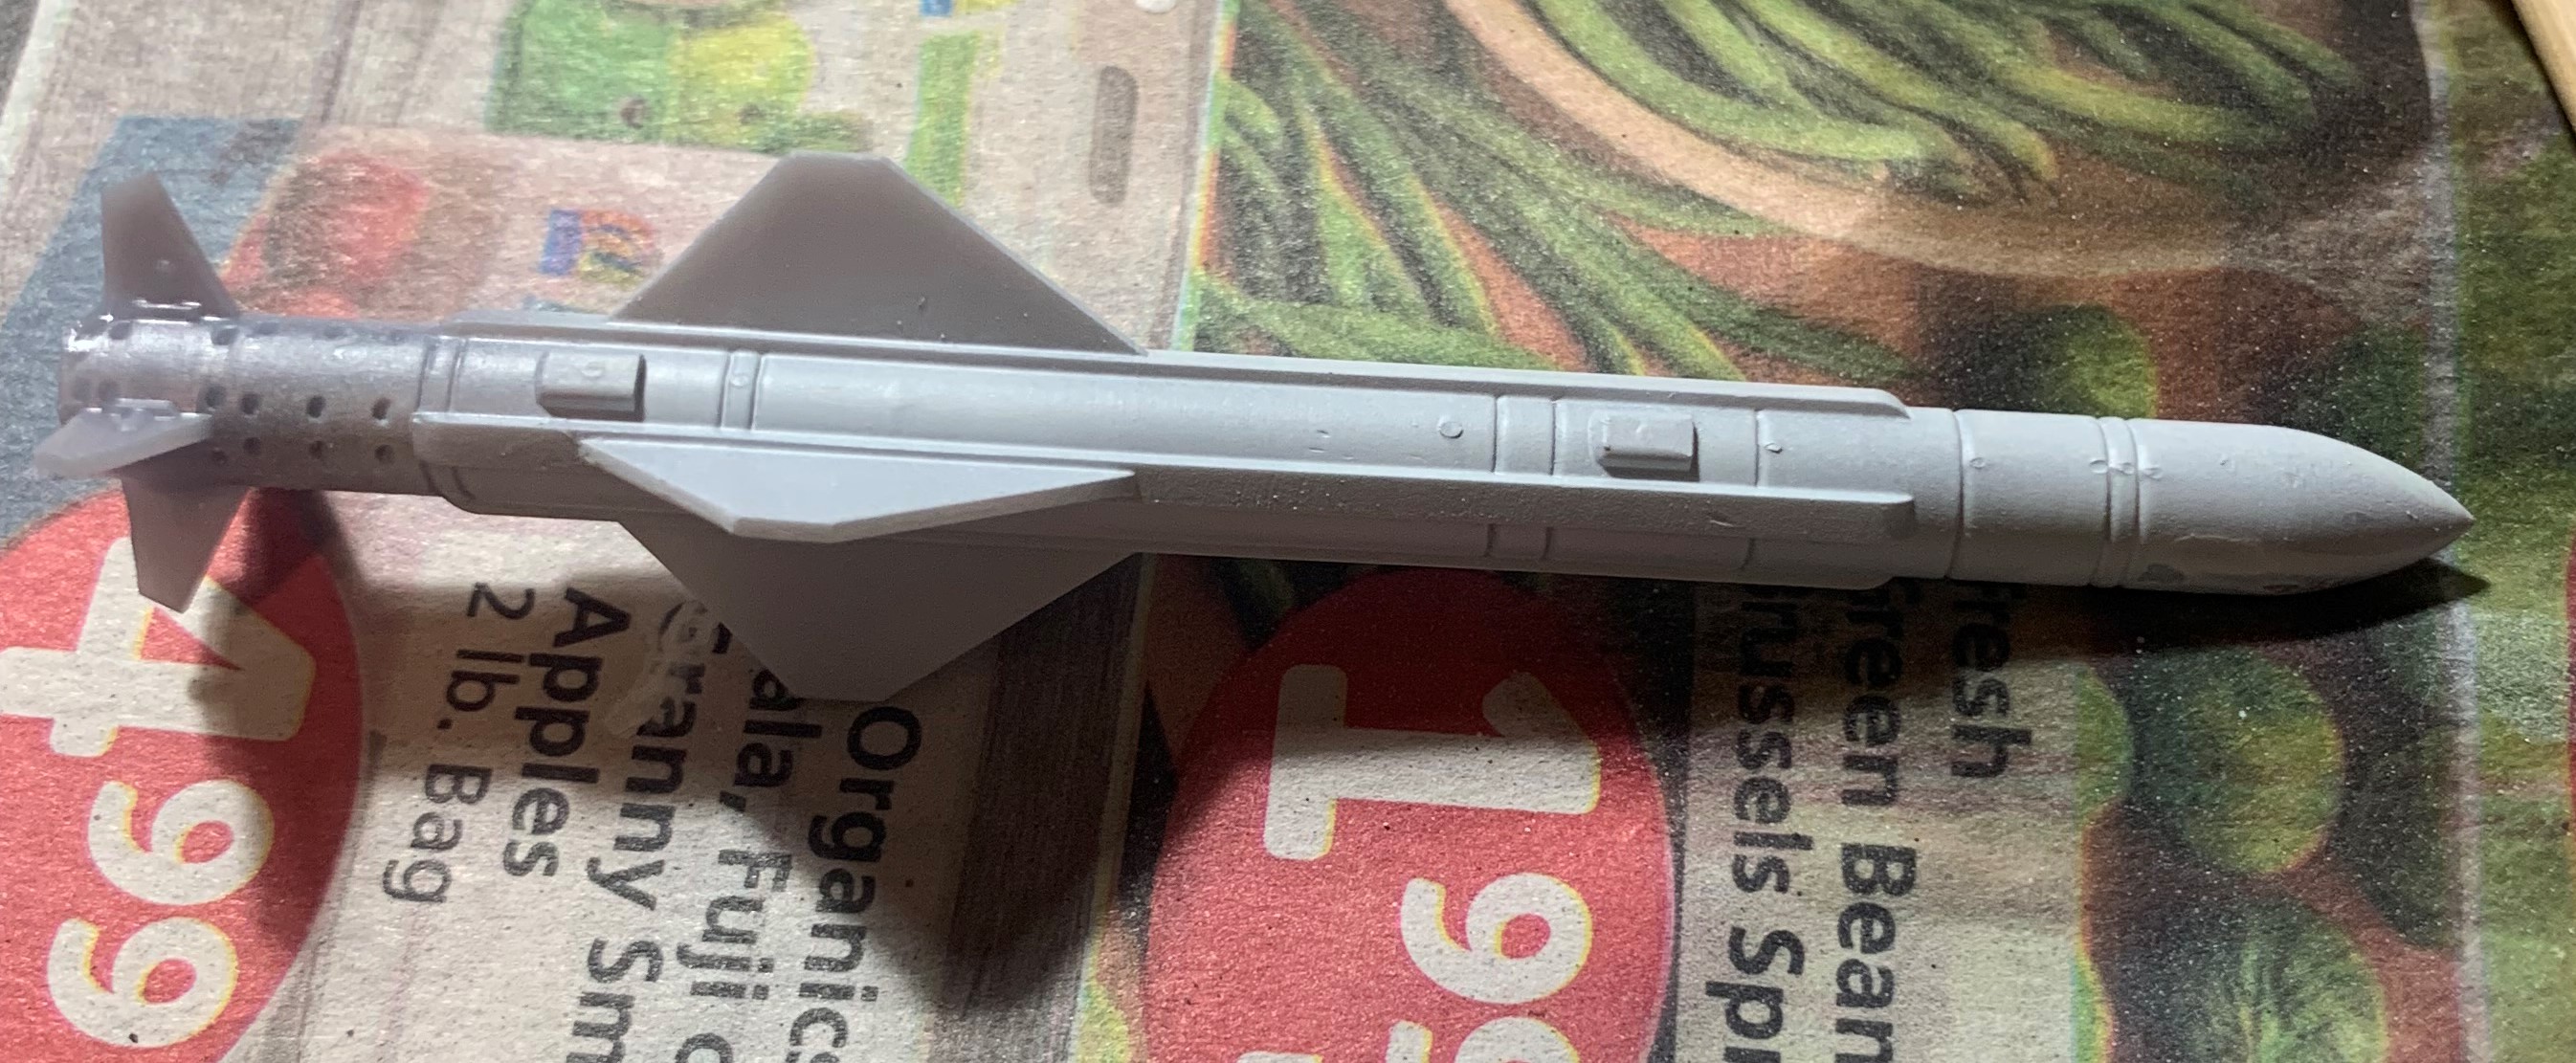
Nothing wrong with the file, just need to change some supports—I did place the verticle support supports on the pylon section of the missile so they won’t be seen, but it still annoys me. I also ended up modeling the Aphid and getting a print, and this has the opposite problem, it might be too short to look good on the wing rail.


I also want to an IRST ball like the MiG-29s had, that may end up being more “old school” in construction. I may use epoxy putty to get the mount right, and then find a glass bead I can use as the actual sensor.
That’s it for now, let’s hope the next update isn’t 5 years down the road…
A Basic Primer on 3D Printing

My gosh, two blog posts in a week?! Unpossible!
Anyways, I promised a basic 3D printing primer, so here it is! This is mostly taken from my “Intro to 3D Printing” class, so if you want a bit more depth, take a look at that.
So let’s get started!
What is 3D Printing?:
3D printing is the process and equipment used to take a digital file that has been rendered in 3 dimensions and producing a physical object from that digital file.
What’s so different between 3D Printers and traditional machining processes?:
3D printing is often referred to as “Additive Manufacturing”, which means that material is built up or added in layers to create an object, as in in the below gif:
 .
.
Traditional machining processes have been dubbed “Subtractive Manufacturing” due to the fact that they start out with a solid block of material, and using various cutters and bits, they remove material till the object takes final shape—as in the below YouTube video.
When did 3D Printing come out?:
In the late 1970s the theoretical groundwork was laid for 3D printing, with the first machine being developed in 1983 by an individual named Chuck Hull ( here is a quick article about him, and the first 3D Printer, the SLA-1). During that time the concept and technology were referred to as “Rapid Prototyping” due to the speed in which a product could be produced as opposed to more traditional methods.
The technology stayed in the domain of manufacturing over the next 20 some years until 2009, when the first consumer machines hit to market.
What is the process for 3D printing?
After a 3D model is designed, it needs to be saved in a file format that can be read by a 3D printer. The first file format, .stl (NOT to be confused with the .stl for certificate trust lists) was created by our friend Chuck Hull and stood for “Stereolithography”. While still a popular format to 3D print from, others have popped up in the last few years such as .obj put forth by Wavefront Technologies.
After the file is saved as a supported file type, the file needs to be cut or sliced into vertical layers to facilitate being printed. There are quite a few open source programs that can do this; sometimes they’re packaged with the printer, and others you’ll need to get on your own. Some examples are Cura, Slic3r, Astroprint and Repetier Host. After the slicer program cuts the model down into layers, the program outputs what is called ‘g-code’. G-code is machine language that tells the printer where to move the hot-end, how fast to extrude the plastic, what temperature things should be at—everything the printer needs to actually print.
What types of 3D printers are there?:
Short answer? Lots. However, most of them have very specific uses, are incredibly expensive, or both. For consumer use, there is really only two types, FDM (also called FFF) and SLA.
FDM stands for “Fused Deposited Material, which is the same thing as FFF or “Fused Filament Fabrication”. In this process, a plastic (usually) filament is heated up to around 200 degrees Celsius (392 degrees Fahrenheit) for PLA plastic or 260 degrees Celsius (500 degrees Fahrenheit) for ABS plastic* in what is called the ‘hot-end’. The hot plastic is then forced through a small opening in the hot head in a process called extruding. The extruded filament is then forced on the build plate in verticle layers, which creates the object.
SLA stands for “Stereolithography”. Stereolithography uses a photo-reactive resin that is exposed to a light source which hardens the resin. The Form 2 we have uses a laser tuned to a specific wavelength to do this, but there are printers that use DLP projectors to do this as well. In the case of the Form 2, a build plate is lowered into the resin, a laser draws a layer of the object, and the build plate then moves up a slight amount (the height of the layer) and the process starts over.
What’s the practical Difference between FDM and SLA?:
FDM printers are more inexpensive. This is true for both the machines and the consumables. PLA can be had for under $30 for a kilogram (2.2 pounds). FDM machines are also easier to work on. Belts, hot-ends motors, etc can typically be accessed (though you may void the warranty) with little difficulty for the end-user. That being said, the quality of the print is limited by the fact that semi-melted plastic is being forced through a small hole. At some point, that hole can’t get any smaller which means the layer height can’t get any smaller. I like to compare FDM printers to dot-matrix printers, perfectly usable to make text documents, but you’re not printing the family portrait out on it.
SLA printers are pricey. While the physical machines are coming down in price they’re still pretty costly. The photoreactive resin can also be pretty costly, Form’s resin, for example, is around $150 a liter ($570 gallon). Other SLA printers have other resins and they’re are 3rd party options available as well, and while cheaper, there are other issues. I’ll probably do a post later on printing cheaper with the Form 2. That being said the quality is far superior to the FDM printers, with the ability to go from printer to casting copies with a very minimum of work. This is your high-end photo inkjet for comparison.
What else should I know about 3D Printing?:
Tons, but this is already a pretty long blog post. 3D printing is brand-spanking new in terms of technology, you’re probably going to have to put in work to get everything to work right. Even printers like the Ultimakers need periodic adjustments and cleaning, etc. The more inexpensive the printer, the more sweat-equity you’re going to have to invest. There’s also supports that often have to be removed with varying levels of difficulty (and frustration), misprints, poorly designed models, bad filament… the list goes on.
In Summary:
This stuff is really, really cool. Seriously. And I’m really glad I’ve gotten the opportunity to learn this at work and get paid to teach it. I plan to get back into more hobby related posts here with a ‘3D printing for hobby use’, but I figured I should at least do a ‘basics’ post. I’d be happy to answer any questions you have!
*These temperature numbers are approximate and may vary by filament and printer manufacturer.
3D Printing and Me.

Last post (over 4 months ago now…), I alluded to the fact that I was getting to do a lot with 3D printers at my day job, so let me fill you in, dear reader!
Over the last 5 or so years, the library I work at has undergone a $25 million dollar renovation and expansion. It’s been fantastic. I’ll spare you all the details but as part of that renovation, we built a makerspace. In anticipation of said makerspace, we purchased a small “One-Up” 3D printer kit (way back in 2015) to learn about 3D printers and how they work. I like to joke that the kit cost $200 and took 200 man-hours to get to working. However, it totally accomplished its goal of teaching us (and by us I mean the IT department I work in) the basics of 3D printing.
Fast forward to April of 2016 and it was time to start purchasing some printers. After hours and hours of research we settled on two Ultimaker 2+ FDM printers and a Formlabs Form 2 SLA printer.
For those that don’t know much about 3D printers, an FDM (‘Fused Deposited Material’, or as it’s sometimes referred to, an FFF or ‘Fused Filament Fabrication’) printer uses a plastic filament (like weed-whacker line) to build objects up in layers. An SLA (or ‘Stereolithography’) printer uses a photosensitive resin and a laser to build objects up in layers. I promise I’ll do a ‘Primer on 3D Printers” post here in a couple of days.
Anyways, back to the printers. The Ultimakers have a great reputation for reliability and consistency of prints—two things we definitely need here at the library. They were a bit pricey compared to the competition, but their reputation has held true and we’ve been very happy with them.
Our other printer, the Form 2, is my baby. With resolution settings of .001 mm, prints are almost perfect. It’s even more pricey, but not compared to other SLA printers on the market. Where they get you, however, is the consumables. Where a spool of filament for the Ultimakers (3.00 diameter) is around $50 for 1000 grams, the resin for the Form (from Form) is around $150 per liter (or to make it easier to conceptualize: about 1000 grams)—or three times the cost.
Furthermore, as part of the mandate for the makerspace, we needed to teach people about this technology and how to use it. In that vein, I started looking at programs that would be easy to use but still be useful for designing things for 3D printing. That’s where TinkerCad comes in. TinkerCAD is a great 3D modeling program that is easy to use. It has some limitations, but for what it does, it does well. So I taught myself the program and in November I started teaching a “3D Design with TinkerCAD” class. I cribbed a fair amount from Chicago Public Library’s Maker Lab Ring Design Class, but did adjust some content to both reflect our printer and my teaching style; as can be seen here. I’ve since added a more advanced class, and am looking forward to doing even more as time allows.
Here’s a nice article the local newspaper did about our makerspace and a horrid picture of yours truly.
So besides a future primer post on what 3D printing is, I’m also planning on doing a couple more posts on TinkerCAD and a website called Thingiverse.
In the meantime, look at some of the cool stuff we’ve printed!

On the right is a Vulture III miniature as it would come out of the Form 2, and the left is a print that has been cleaned up, painted and based. Model courtesy of Matthew Cross.

A tiny AT-ST printed on the Form 2 that is supposedly in-scale with Fantasy Flight’s ‘X-Wing’ game. Model from Thingiverse.

A 1/100 scale M4A3E8 hull printed on the Ultimaker. Model from Thingiverse.

A ‘not-30K Rhino’ from Thingiverse, printed on our Form 2. I modified the file and cut out the as-designed hatches and designed one new one, and used a stock plastic one for the other.
Moving Woes and a Quick Update

Hi.
It’s been a helluva few months. In the beginning of July we were notified that our landlord was going to sell the condo we were renting. Not only was this a shock—coming out of nowhere, but it was really demoralizing. This meant that the hobby stuff was the first to packed, as it wasn’t something we “needed” daily, and is kind of tedious and time consuming to pack.
Anyways, we live in a college town, so finding a place to live around July-August is pretty difficult. It took us two months and looking at 9 places (and $150 in application fees…) to finally find a place that didn’t suck. The one thing going far it is a nice finished room in the basement where the wife and I can both do our hobby stuff.
So that’s been my last few months, and why I’ve been so quiet. I have been sharing stuff on my Commonplace Modeler Facebook page but that’s all I’ve really had time for.
However, at work we’re starting a public makerspace with 2 Ultimaker 2+ FDM printers and a fantastic Form 2 SLA printer which will be a subject of a a future blog post (maybe today) and how I see it affecting the hobby as we go forward.
Bolt Action Part Duex
Well, it’s been a couple of weeks, but I’ve made some headway on my little test squad of American troops:

Basecoated and test washes applied.
Here they are basecoated and washed. For the washes I tried 5 different ones to see how I liked them, but I can say that I don’t think that how I did the zenithal highlighting had a lot of impact here. I’m going to end up priming another figure straight black and see how he comes out as a control, however, it’s not like rattle canning the additional colors took a lot of time, so I’m not really out of anything either.
For the colors on these guys, I went with Army Painter Army Green for the coats and Puttees, Vallejo Model Color (VMC) English Uniform Brown for the paints, VMC Iraqui Sand for the pack, VMC Pastel Green for the webbing and Leather Brown for the boots.
Now, a few of these colors I’ve gotten from the web, and others were kind of ‘eyeball to memory” trying to figure out colors from re-enactor’s gears and the such from Google Image results. I’m not happy with packs (too light) and the pants (just not close).
With that in mind, I decided to order some books from my local library dealing with uniforms and see if I could come up with some more accurate colors. I’m not done yet, but one book that’s just jam packed with pictures is Windrow and Hawkins’: The World War II GI, US Army Uniforms 1941-45 (https://goo.gl/vS28x8). I’ll probably do a blog post on just the uniform stuff I learn from there.
After I was done basecoating, I attacked them with a variety of washes, including some I made from Les Burley’s wash recipe (https://goo.gl/1k2JEc). I made his Soft and Heavy Body Black along with a Sepia Wash. I also used Vallejo Sepia Wash. For the Burley Sepia wash, I tried a couple of different ink concentrations: 40 and 50 drops of the FW ink.

L-R: Vallejo Sepia, 40 Drops Burley Sepia, Soft Body Black, 50 Drops Burley Sepia and “Mix”
The Vallejo Sepia Wash worked, and would probably be fine for this, but I felt like playing around. The 40 Drop concentration of Burley Sepia wash was really light. A couple of applications would probably work OK as well. However, my goal is speed, so I I’ll probably skip this. I really liked how the Soft Body Black flowed and acted, but it was too harsh of a color. Next was a 50 drop concentration of Burley’s Sepia and this was pretty good. This maybe the way I go. The last one was a bit of a mix that I, uh forgot to write down like an idiot. Of course, I like this one a lot. I think this was the fifty-drop Sepia concentration, with some black ink mixed in. I *think* I figured it would be the fifty-drop sepia with 5 or 10 drops of black ink.


So, I need to find a better color for the packs, the pants and nail down my wash. And then I’ll be able to start.
But I am getting there, and learning quite a bit as I do so, which I consider a win.
Till next time!
Bolt Action and Trying New Things
I, like many wargamers, am a big history buff, and I have a deep interest in the Second World War. So, when I saw Warlord’s Bolt Action at GenCon 2011 (or maybe it was ’12) I was immediately fascinated. While I had obviously seen Flames of War, the small scale (15mm) didn’t really do much for me (I already do micro-armor and BattleTech in 6mm), where as the comparatively large size of BA’s 28mm pulled at me. Much like the modeling opportunities presented by Warhammer 40K (also allegedly 28mm), I felt I could really have some fun modeling these guys.
Alas, the timing wasn’t right and it wasn’t to February that I finally took the plunge and picked up some minis to play Bolt Action. Like most of my purchases, I bought a US army force used off a friend. The infantry is a mix of Warlord plastics and Black Tree Design metals backed by a collection of Warlord resin vehicles and metal support units.
While the Black Tree sculpts look nice, proportionally they just don’t jive with the Warlord plastics. I’ll probably sell those off and use to the money towards fleshing out my force.
Anyways, as I have about a million different projects going, I’ve decided that I’m going to “speed” through these guys. I’ll never be a Golden Demon painter and I think I need to accept a certain amount of compromise on these guys to get them to the table in a reasonable amount of time. And, even when I do spend a lot of time on a model, I still find myself missing something or screwing something up. So I’ll spend my time on character models and paint up the rank-and-file to (what I hope is) a good table top standard.
To achieve this, I’m going to be trying out a couple new-to-me techniques. Including using Zenithal highlighting and ‘dips’ (though I’ll brush it on).
So to begin, I picked five random GIs, cleaned them up, based them with some sand and hot glued them to a strip of cardboard.
I then rattle-canned them Colorplace flat black all over and let them dry. The next day, I hit them with grey primer, holding the can parallel to the mini’s torso and applied thin, quick coats.
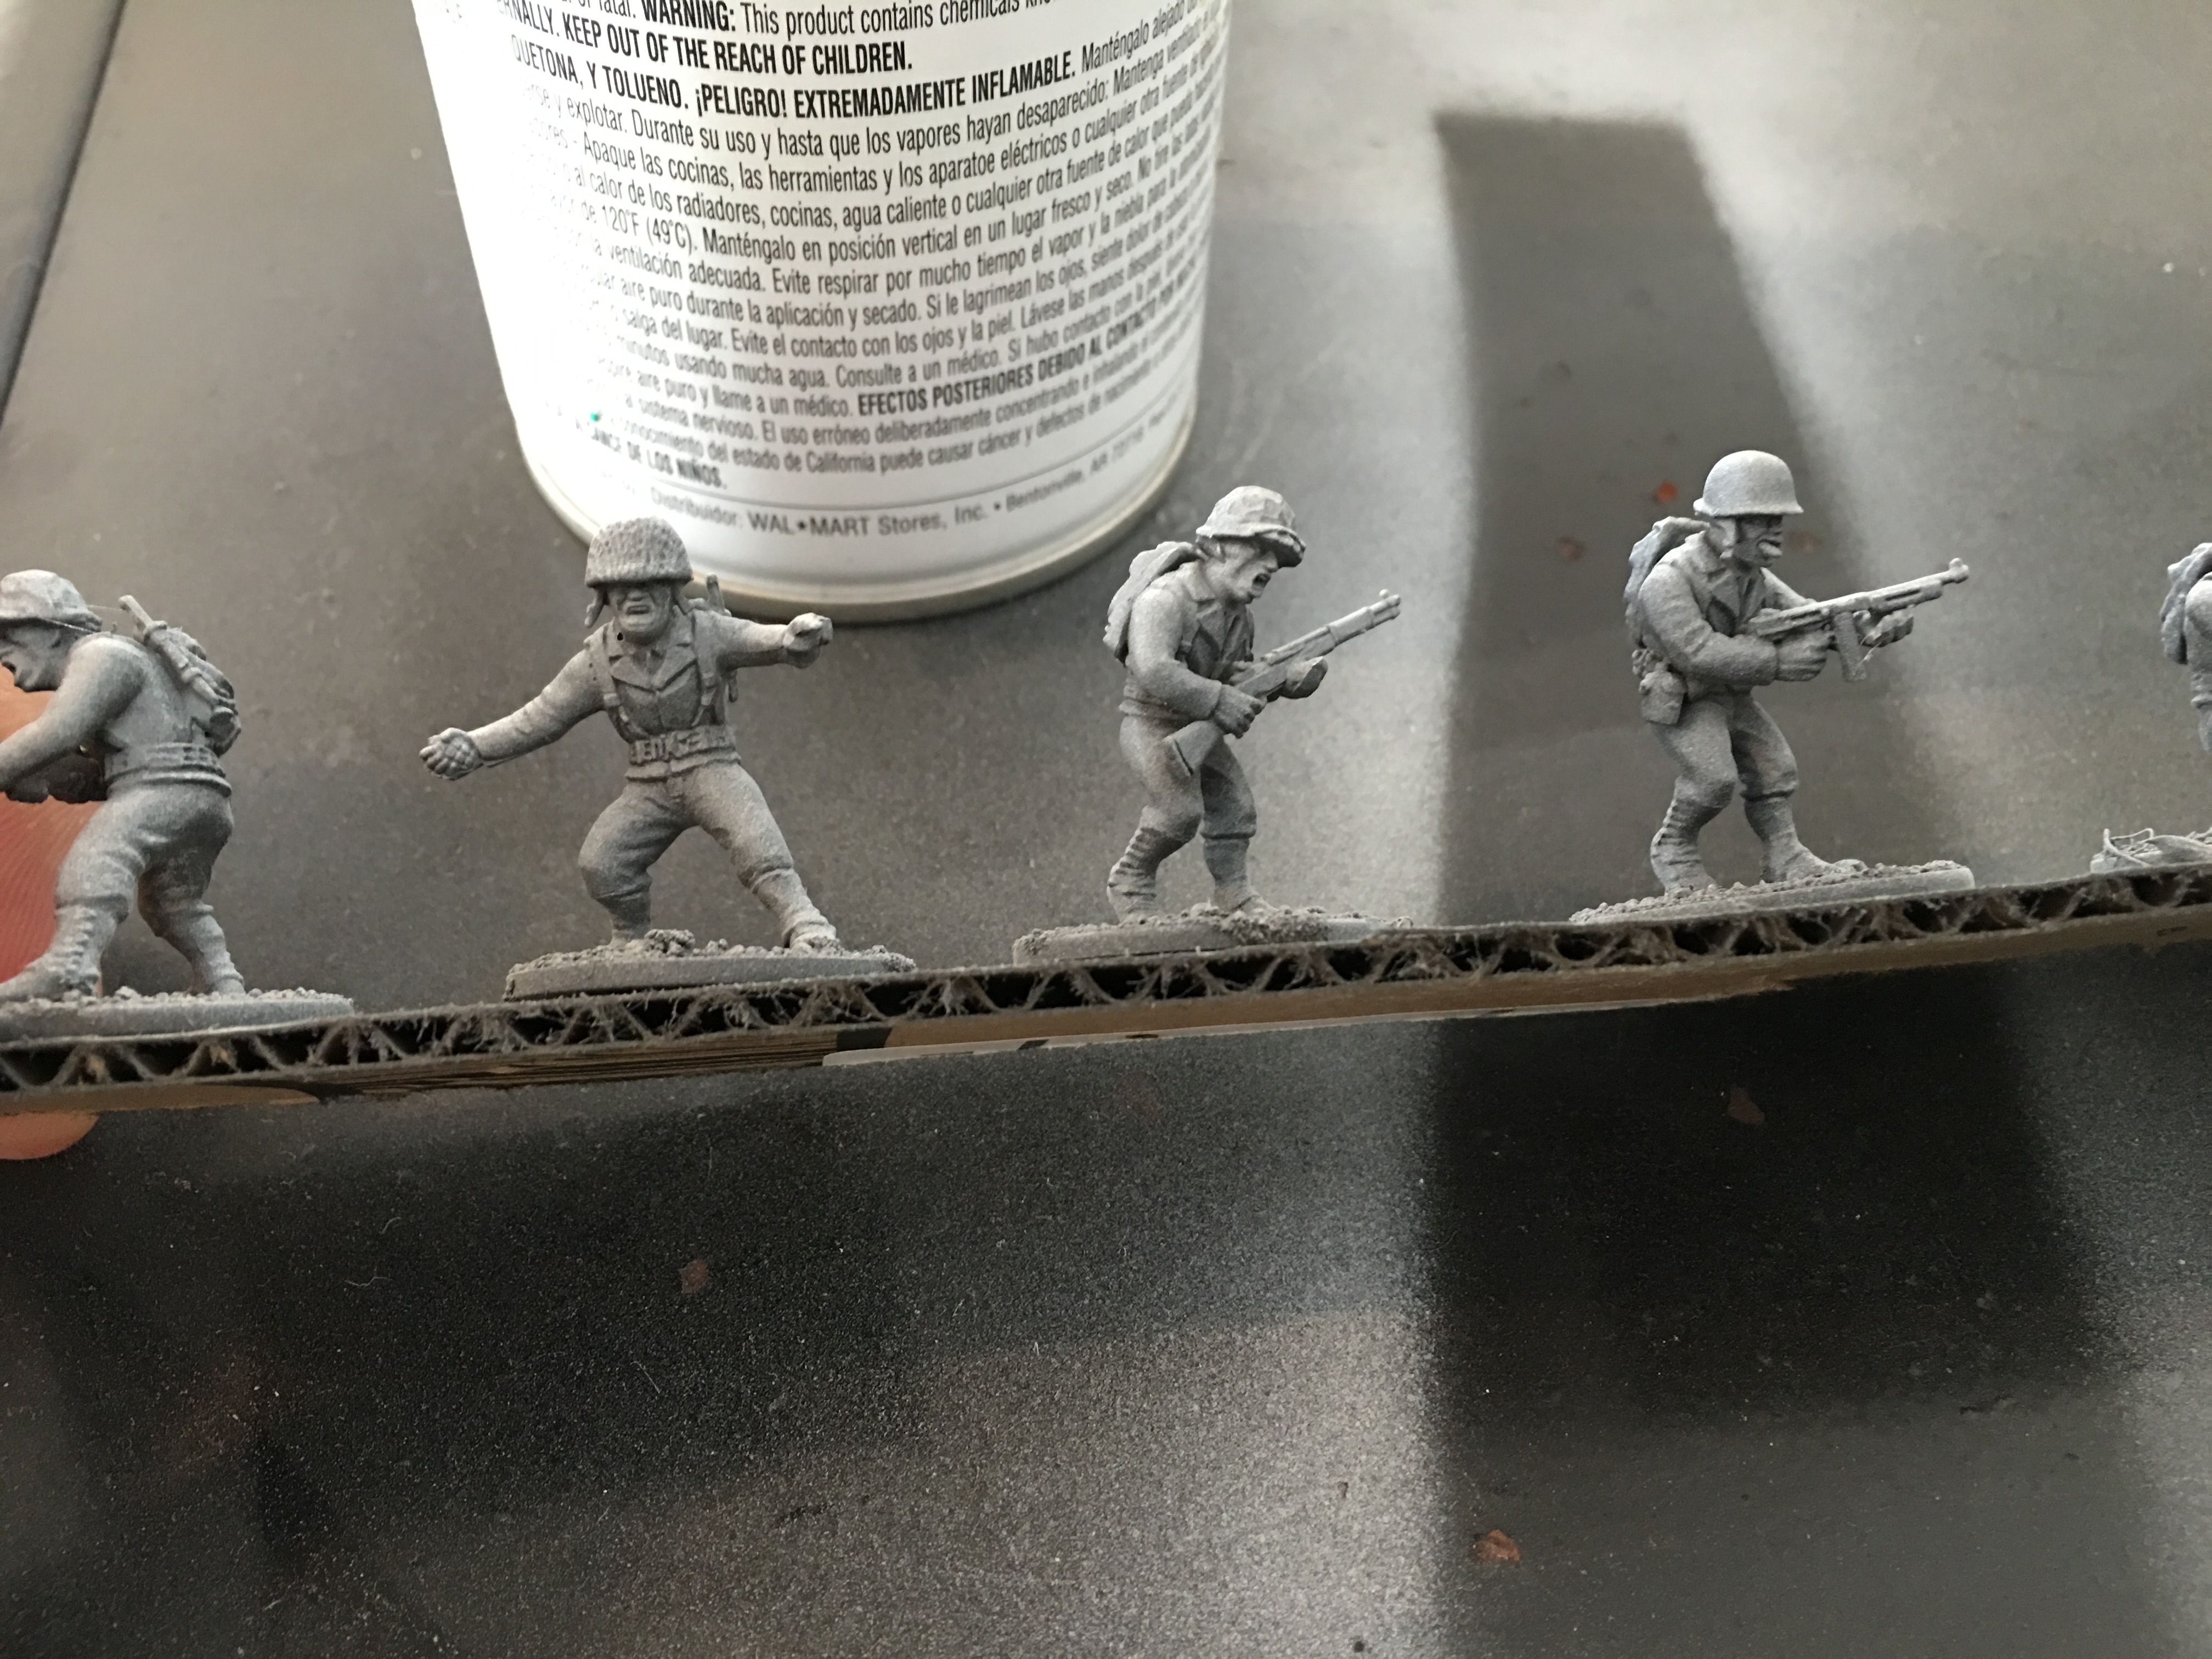
Grey mid-coat applied. You can kind of seen the black in the shadows.
I followed this up with white, holding the can directly over the mini’s head and again, spraying in quick, thin coats.


You can see the built in highlights contrasted to the black basecoat. The question is, will this show through the coats of paint to follow?
To be continued…
Vindicare
So one of the side projects I’ve been working on since February has been a Vindicare Assassin from Games Workshop. Basically a super sniper with a BFG.
I thought he’d be a decent addition to my Imperial Guard army, making up for the usual lackluster hitting ability the Guard is famous for (and my abysmal dice rolling skills don’t help with). He can also ally with my future Space Marine and Sisters army’s as well.
I also decided I really wanted to paint this guy my best, so I picked up the White Dwarf that had the relative “how-to-paint” article in it, and got cracking. Though I will say I substituted some colors (especially for the base) that looked close enough. On others, such as the Dark Reaper and Kabalite Green I picked up as I had nothing even close—which is saying something with an inventory of 248 paints…
While I see room for lots of improvement, I am really happy with how he turned out. The highlights are a bit too thick, and in someplace awkwardly placed, but as this is really the first time I’ve gone in for edge highlights, I think it’s pretty good.


I’m also really happy with base. I misplaced the original (only for it to pop up a week later) so I used a correctly sized MDF one. The kit itself came with the pillar and standing platform to glue the assassin too. but that didn’t cover the whole base. I decided to glue some grit on both the platform and the base to extend and tie everything together. I also added some of my bricks in to rubble the place up a bit more. Then everything was painted and dry brushed per the directions in the White Dwarf and Boom! A pretty nice looking base, if I say so myself.
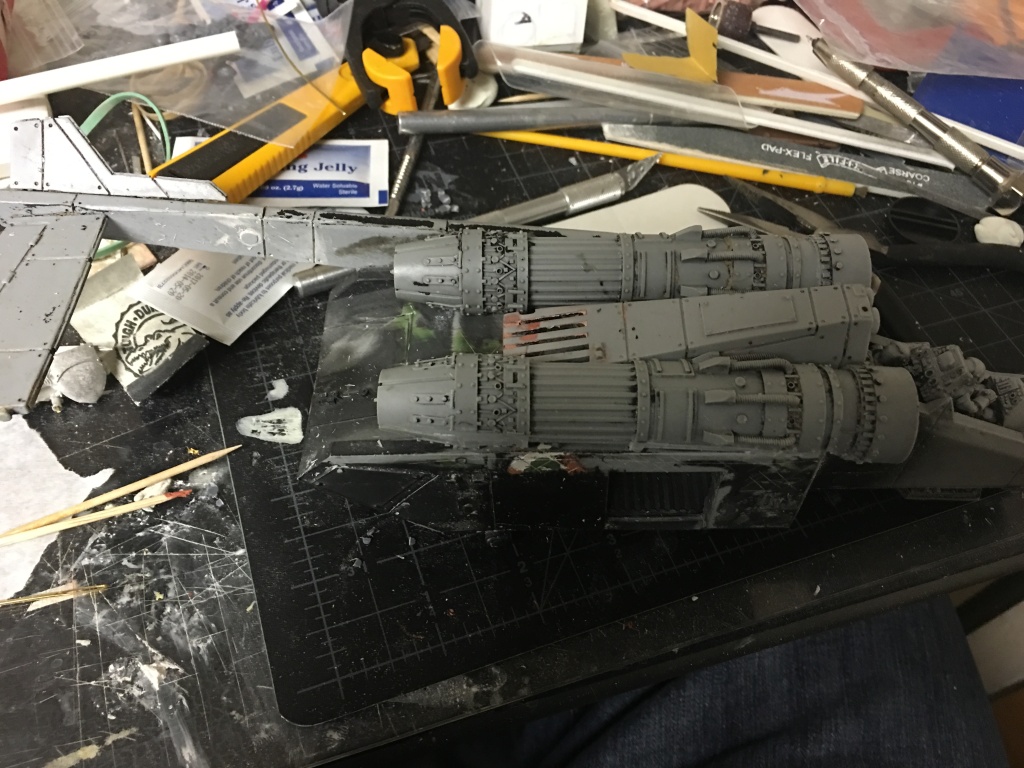
Getting There—Project: Valkdetta

Well, after more than a year, Project: Valkdetta is mostly complete. All the major sub-assemblies are done and it looks like what it’s supposed to be. I’m missing the lower vertical stabilizers (I’ll have to look if I ever got them or not) and the front sensor array. If I don’t have the parts I’ll have to see if I can buy them reasonably or if I’ll have to plastic-card them.
Getting the booms and wings on was a bit of pain, what with the original alignment pegs having been broken in the tear-down process. It’s not perfect but I did the best I could. With the wings at least, the old mounting holes were still present, so I used the center of them to drill out holes for pinning.

Hard to see, but pins for the wings to mount to.
For gluing all the major assemblies, I used JB Quick 5-miniute epoxy. I wont say it’s indestructible, but if something breaks, things have gone horribly wrong.
While I was test fitting the left wing on, I noticed the wing had gotten horribly warped. I can only imagine that it happened after I broke the model down and must have set something down on it.

You can see Valkdetta’s wing compared to a plastic Valkyrie wing. Just a *bit* off…
Not to be discouraged (I totally was…) I decided to try boiling it and bending it back to the correct angle. Once again, it’s not perfect, but the angle is correct now (even if the wing has some ripples in it) and I decided to go ahead and glue it on.

You can see the left wing isn’t perfectly straight, but…
I still need to fill in some gaps on the wing to fuselage joint and clean up some of the JB Quick that got where it shouldn’t be, but Valkdetta is now clearly a Valkyrie. I’ll fluff her rough appearance to being an old bird with a lot of battles behind her.

A *bit* of an improvement. If I say so myself.
Some Updates

So as I’m dealing with a bum ankle, I might as well post some pictures and what not of what I’ve been up too.
Project: Valkdetta
Valkdetta is getting along. Engines and center hump-thingy are on, as well at the one boom. The other boom was a bit trickier—I had to clearance the engine to make sure it fit. That’s all settled now, so this weekend should see her getting close to completion. Just in time for the new Death From the Skies book to hit, even though it apparently doesn’t have anything about the Vendetta—or any of the FW fliers.


Here is my Vindicare assassin. I’m trying to follow the tutorial in “White Dwarf” as closely as I can. It’s my fist time painting anything in that style, so… I don’t hate it yet, but those edge highlights are a bit thick in my opinion.
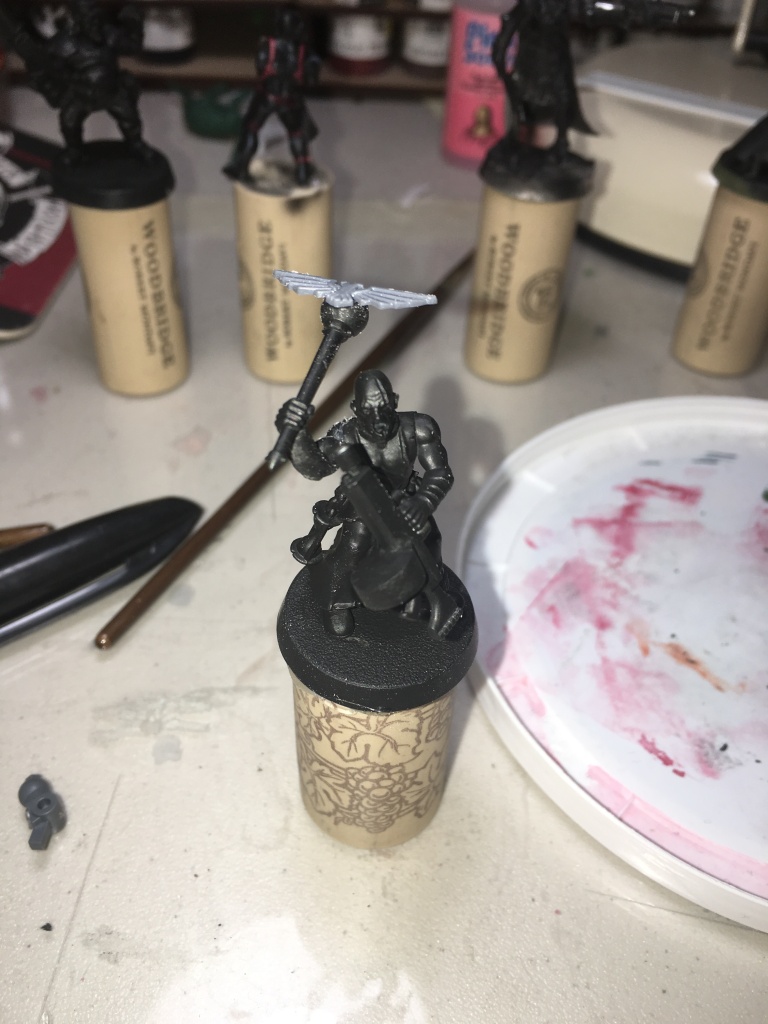
REPENT!
This is my ‘bits’ priest. I picked up a bag of WFB Empire bits at Adepticon for $4 and made this guy. I added boots to him, and cut the spikes of his mace. He still looked more Chaos then not though, so I added an Aquila emblem from the Imperial Tank Sprue. I like him much better now. The autogun was made from a spare lasrifle, plastic tubing and some greenstuff.

For the Somewhat Better Good!
I’ve been working on my Tau infantry at work during my lunches (cleaning them up and such) and decided I might as well throw paint on them. These are all second hand, and let’s face it, the old sculpts weren’t so great to begin with. These will be fluffed as a backwater garrison that suddenly got reinforced with some front line units. That’ll explain the old metal stealth suits I have as well as the old Crisis suits.
Projects
I have to many damned projects started and not enough finished.
So for now, I need to concentrate on what I have started and what can be quickly finished. Like a reverse triage system.
Projects like Project:Bass-ilisk. She’s currently been undercoated in a metal color, I just need to get some rust on her and then I’ll be ready for chipping medium and painting.
I have a few other not-named projects that have been shot with primer (a re-hashed Demolisher and a couple of Chimeras) that need the metal basecoat for weathering applied.
My Vindicare assassin is…oh 60% done. He’s turning out pretty good. So he should be pretty easy to finish quickly.
Project Valkdetta is getting there, one of the booms has been epoxied on, and the other side I had to clearance the engines, but the other boom is ready to go on, then it’s just the wings, doors, weapons and canopy. And paint. So yea, like almost done. ![]()
Then there’s the ‘Pile o’ Russ’, 5 Leman’s (three old style from the ARMAGEDDON boxing and two newer ones) that have their hulls done, but I need to work on the turrets yet. I’m thinking of just magnetizing them (perfect candidates from the ‘Single Magnet Magnetizing’ but I do have to re-barrel the battlecannon—I can’t stand the stock one.
I’ve managed to primer the vast majority of my built Cadian and Catachans. I’ve also got almost all of my Tau infantry done as well. Though those I mostly prep at work on my lunches, so they haven’t yet taken away from my ‘regular’ hobby time. But painting them is going to be a huge time sink.
Hmmm, what else… Oh, making my Valhallans. Though I need to come up with a suitable name for them, since they aren’t strictly Valhallans. Due the the Ushankas hitting on the molded in greatcoat collar, I’ll have to clearance them, so while not the quickest conversions, it’s not too involved.
Oh, right, my Mantic Space Dwarves. I’ll have to finish those too.
Damn. I have a lot to do.
So I guess in order of quickest time to completion and to maximize tool usage time:
Do metallic basecoat on primed Tanks and Chimeras
Add rust to Project: Bass-ilisk and tanks and Chimeras.
-Apply chipping medium
-Do paint and remove medium (if you wait to long, the chipping medium doesn’t release right…)
Vindicare finishing up.
Do magnetizing for Pile o’ Russes and make new Battlecannons
Valk-detta
Paint my primered infantry
Work on my not-Valhallans.
